


To use NotebookLM, now Gemini Notebook, create a notebook, add the sources needed for one question, and select them before starting chat. Ask for evidence, open the citations, and save a checked answer as a note. Generate audio or study materials after that check, and inspect your usage allowance before starting a large batch.
Google renamed NotebookLM to Gemini Notebook while keeping it a standalone research product. The NotebookLM guide you searched for still applies to that product; current menus and help pages use Gemini Notebook. Its Studio includes reports, audio, video, mind maps, flashcards, quizzes, data tables, and slide decks.
Use the source-to-output loop. Build a focused source set, ask one cited text question, and check the cited passage before saving the answer. A citation can lead to the right document while the answer still says more than that document supports. Checking the passage catches that mismatch before you turn the answer into something you will share.
- Ask the app to mark each answer as supported, inferred, or unsupported.
- Make audio only after the cited text answer is checked.
- Split large projects by decision, chapter, or argument. Add a bridge note that says what each notebook includes and excludes.

Synthesize beyond one NotebookLM notebook
Bring core sources together, ask across them, and inspect each citation.
Gemini Notebook Features by Job
Choose a feature after you know what the notebook needs to produce. Google's current help pages separate chat and citation checking, source intake, and Studio outputs such as maps and study materials. The feature name matters less than whether the output can be checked against the selected sources.
| Research or study job | Start with | Verification step |
|---|---|---|
| Ask a question across selected sources | Chat | Open the citation and confirm the exact passage |
| Keep a checked finding | Notes | Write your interpretation separately from the saved response |
| Review while walking or commuting | Audio or video overview | Check names, numbers, and causal claims in text before reuse |
| See the structure of one notebook | Mind Map | Open the supporting source before treating a branch as evidence |
| Practice retrieval before an exam | Flashcards and quizzes | Correct ambiguous prompts against lecture or reading material |
| Turn sources into a structured output | Reports, study guides, tables, or slides | Treat the generated artifact as a draft derived from the notebook |
Table 1: For exam preparation and course-specific use, continue with the NotebookLM student workflow. For changing quotas, source constraints, exports, and notebook boundaries, use the NotebookLM limitations guide.
How to Start Using Gemini Notebook
For a student walkthrough from fourteen interviews, see the student's guide to AI research.
Open Gemini Notebook, sign in, and create your first notebook. Start with a few sources you can inspect yourself before importing the rest of a project:
- Go to notebook.google.com.
- Sign in with your Google account.
- Select Create new notebook and give it a project name.
- Select Upload a source or Add sources and choose relevant documents.
- Select the sources for your question, then ask it in Chat.
Use a question whose answer you already partly know for the first pass. For example, ask which method a paper used, then open the cited passage and check that the method is present. If the import missed the methods section, fix the source before using it in a broader comparison.
What to Check Before You Start
Before you build a workflow around Gemini Notebook, check your account type and remaining allowance. Free access can suit a focused project, while paid or organizational access can change the available features and limits.
- Open Settings, then Usage, to inspect your AI usage and weekly limit.
- Run a one-source pilot before a large upload. If the app cannot cite headings, tables, or source context from one file, fix that source first.
- Check Google's current usage documentation. Usage is based on compute: request complexity, models, features, and chat length affect consumption. Five-hour quota refreshes operate within a weekly limit.
- If you use a work or school account, ask your admin which tier you have. Google lists work, school, and enterprise tiers.
- Use the browser for full source and Studio workflows when a mobile feature behaves differently.
- Before generating a Studio output, inspect its expected usage cost. On the web, Generate later can queue generation when the current allowance is exhausted.
Avoid planning a full week around an old daily chat or Audio Overview count. Finish the question you need answered first, then spend the remaining allowance on outputs you will use.
How to Verify NotebookLM Outputs
Gemini Notebook works from a selected source set. For a source-checking task, name the sources and require supporting passages. Google's chat help also describes experimental actions such as web research and code execution; check whether your requested task adds material beyond the documents you selected.
| Workflow layer | Standard chatbot habit | NotebookLM habit |
|---|---|---|
| Context | Paste a chunk and hope the model keeps enough context. | Upload the full source set once, then select the sources relevant to the current question. |
| Reasoning | Ask for a broad answer first. | Ask a narrow cited question first, then broaden only after citations check out. |
| Verification | Fact-check the final answer externally. | Open cited passages while the answer is still in draft form. |
| Output | Copy the answer into notes, slides, or audio manually. | Save the checked answer; select the relevant sources again before generating Studio materials. |
Table 2: The source-based workflow keeps the evidence visible while you decide which answer is safe to reuse.
Use this method when the output will leave the app. It fits class notes, review claims, meeting briefs, study guides, and client work. The citation-checking step is the part most people skip, so use this exact pattern:
- Ask one narrow question that names the source or source subset.
- Read the answer, but do not copy it yet.
- Open every inline source marker attached to the claim you want to reuse.
- Decide if the cited passage supports the claim, only relates to it, or conflicts with it.
- If support is weak, ask:
Rewrite this answer using only claims directly supported by the cited passages. - Save the corrected answer as a note only after the citations survive that check.
How to Prepare Gemini Notebook Sources
Choose sources that directly address the question. A pile of related material can help you explore, but a smaller selection is easier to inspect when you need a claim for a paper or report.
Source Prep Rubric
Use this rubric before you upload key files. It is faster to fix a source first than to debug vague answers later.
| Source trait | Good upload | Risky upload | Why it matters |
|---|---|---|---|
| Heading structure | Clear headings, abstracts, captions, and appendices | Scanned pages or copied text with no structure | The app can point to the right passage more easily when the file has landmarks. |
| Version control | One current version with a date in the title | Draft v3, final v2, and exported copy all in the same notebook | Duplicate versions make contradiction detection harder because the model may treat stale text as equally authoritative. |
| Citation identity | Author, title, date, and source name visible in the file or filename | Generic filenames like download.pdf or notes.docx | Clean labels make follow-up prompts and citation checks less ambiguous. |
| Scope fit | Directly relevant sources for one project question | Background material included "just in case" | Extra context can dilute answers and make the notebook feel smarter while becoming less precise. |
Table 3: Clean, current, well-structured files produce answers that are easier to trace and verify.
If the rubric shows that your sources belong in several notebooks, test the handoff before moving the whole project. Collect the 10-15 files you cite most, upload them to one Atlas project, ask one question that spans two notebook topics, and open the cited passages. Stay in NotebookLM if one notebook already answers the question cleanly.
Organizing Notebooks
Create one notebook for each project. A remote-work project may cover productivity studies and management research in the same notebook because all three serve the same goal.
Give each notebook a descriptive name. Research Project - Remote Work Productivity is better than Notebook 3.
For a finished project, save the checked notes and outputs you need and record which source versions supported them. Start a new notebook when the question changes enough that the original sources no longer fit.
Check Imports and Source Changes
Google's source documentation lists supported formats and import boundaries. Uploaded PDFs, Word documents, slides, spreadsheets, text, images, and audio can supply different kinds of evidence; a successful upload does not prove that every useful detail was captured.
Open an imported source and find the passage you expect to use. Drive files auto-sync, but comments and footnotes from Google files are not imported. If a colleague changes a Drive document, recheck the supporting passage before reusing an earlier answer. Losing access to that Drive file can also make it unavailable to the notebook.
A public YouTube import uses its transcript rather than the full audiovisual experience. Check the transcript against the video when the claim depends on a diagram, demonstration, or a speaker's tone. For a web URL, verify the imported text rather than assuming linked pages or embedded media were included.
Source Limits and Workarounds
Gemini Notebook still has source limits in addition to its compute allowance. Check the limits that apply to your account before merging or splitting files:
- Merge related sources before uploading. If you have five short memos on the same topic, combine them first.
- Prioritize high-value sources. Upload your most important papers first. Leave unused background files in your reference manager.
- Use multiple notebooks for distinct questions or subtopics. Each notebook remains independent; a chat in one does not automatically inspect the sources in the others.
For a full discussion of source limits and other constraints, see NotebookLM's limitations.
How to Ask Better NotebookLM Questions
The way you phrase questions changes answer quality. These patterns work.
Ask for a Specific Result
Use prompts that name the job.
- Instead of
Summarize this paper, askWhat did Chen (2025) test and find?. - Instead of
What's important?, askWhat are the three main claims?. - Instead of
Explain this topic, askHow do my sources define cognitive load?. - Instead of
Compare these, askHow do Smith and Jones differ?.
Prompt Across Multiple Sources Deliberately
When you want synthesis instead of summary, name the comparison job explicitly:
Across Sources 2, 4, and 7, which claims are shared, conflicting, or unique?Create two columns: safe claim and exact passage that supports it.Rank the sources by strength for [argument]. Say what each source can and cannot prove.Show the strongest counterargument before the main answer.Separate direct evidence from your interpretation.
How to Ground Complex NotebookLM Projects
Once the basics work, use NotebookLM less like a chatbot and more like a reviewer.
For source grounding, make the role about the task. Act as a skeptical reviewer. Mark each sentence as supported, inferred, or unsupported. is stronger than Act as a professor. It tells NotebookLM what evidence check to run.
For audio, create it after the text answer passes citation checks. For technical sources, ask for a claims to check before listening list first. Use the audio for review and keep the cited text as your source of record.
For large projects, split notebooks by decision or chapter. File type is a poor guide because the same argument may rely on papers, notes, and transcripts. A literature review might use one notebook for methods, one for findings, and one for counterarguments. Add a short bridge note that says what each notebook includes and excludes.
Example: Check a Research Disagreement
Suppose your literature review includes one observational study and one trial about the same intervention. Select those two papers and ask:
Compare the conclusions in these two sources. For each conclusion, identify the study design, the outcome measured, and the passage supporting it. Separate differences in evidence from differences in wording.
Open the citations for the design and outcome before accepting the comparison. If the studies measured different outcomes, keep that difference in the note; do not turn it into a claim that one disproves the other. If the answer gives a shared causal conclusion that only the trial supports, ask it to separate the sources' contributions.
Accept a sentence only when the cited passage supports who was studied, what was measured, and what the answer says. The example gives you a check to try on your own papers before using an answer in a draft.
When to Use Audio Overviews
Audio Overviews turn notebook sources into a listening format. They remain part of Gemini Notebook after the rename. Use them for review, then check final claims in the cited text. For other audio workflows, see our guide to NotebookLM audio alternatives.
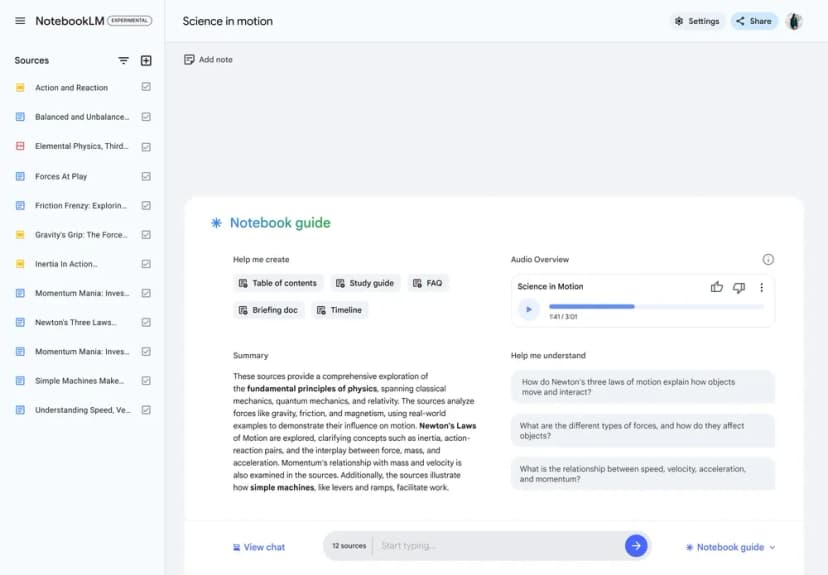
The earlier NotebookLM interface placed Audio Overview beside the Notebook guide. Its selected sources sit on the left, with generated study options and an audio player in the main panel. That layout shows how a listening output comes from the notebook sources. In current Gemini Notebook, look in Studio for Audio Overviews. Check the underlying cited text before sharing claims from the spoken summary.
Use audio for a second pass while commuting or reviewing. Use the original sources and cited text for methods, numbers, and claims you plan to cite.
To make the spoken review useful:
- Set a focus before you create the audio.
- Make separate versions for methods, findings, and next steps.
- Listen with notes open, and mark claims that still need source checks.
How to Build Gemini Notebook Notes
Use notes to keep checked answers and your interpretation beside the source material. The way you create a note determines whether you can edit it later.
Saving AI Responses as Notes
Select Save to note to preserve a useful chat response. According to Google's notes help, saved response notes cannot be edited. For your own commentary or corrections, select Add note and write a separate note.
Workflow:
- Ask a question and get a useful answer.
- Save the answer as a note.
- Write your interpretation in a separate editable note.
- If you want that note included as evidence for later questions, open it and select Convert to source.
Building Running Notes
As you work through your sources, create synthesis notes:
- Theme notes:
Sources agree that X, but disagree on Y - Gap notes:
None of my sources address Z, which matters because... - Connection notes:
Source A's finding about X explains why Source B found Y
Label your own view when you convert a note to a source. That note records what you think the papers show. Check the papers themselves before treating your note as proof.
Export Notes for a Draft
Use the three-dot menu beside a note to export it to Google Docs or Google Sheets. Tables can become separate Sheets tabs. Changes made in an exported file do not sync back to the notebook, and notebook sharing permissions do not carry over.
After exporting, check the destination file's access settings and reopen the evidence for claims you plan to cite. Keep the paper's bibliographic citation in your draft rather than treating a notebook citation marker as the finished reference.
How to Apply Gemini Notebook at Work
For a paper, select the studies you intend to cite and ask for supporting and conflicting evidence. For a meeting, select reports, past notes, and proposals; request talking points by agenda item. For a new subject, ask for the core ideas, then verify each against the selected reading.
Recheck answers when a Drive source changes. Keep measured findings separate from anecdotes and commentary. Export checked notes to Docs or tables to Sheets, then review the destination file's access settings.
If an import fails, check its type, size, and access first. If an answer is wrong, inspect the cited passage and request a narrower correction. If a Studio output is wrong, return to source selection before generating another version. Use the Help Center for changed menus or features.
Before sending feedback, check what Google collects. Consumer feedback can include sources, prompts, and outputs. Work and school accounts have different terms; check with your admin before including confidential material.
For collaboration, share at the notebook level only when others should see the sources. Google's sharing flow supports Viewer and Editor roles. Viewers can read shared sources and notes. Editors can add or remove them. A chat-view link can reduce clutter, but it does not hide the notebook's shared material from an authorized viewer.
Gemini Notebook Boundaries to Check
Check the boundary that affects your task before changing tools. For plan-specific constraints, see our NotebookLM limitations guide.
Each Notebook Is Independent
Google documents each notebook as independent. If a question needs the sources from two notebooks, bring those documents together for that question rather than assuming one chat can inspect both.
Mind Maps Stop at One Notebook
Gemini Notebook Mind Maps can show links between ideas from your sources. Open a branch to find the relevant source, then read it to see whether the study backs that link.
Exports Need Separate Checks
Notes, reports, and data tables have export paths; they are not all locked inside the app. An exported file has its own permissions and does not maintain a live link back to notebook edits. Check its content and access before handing it to someone else.
Gemini Apps Behaves Differently
Notebooks can also appear in Gemini Apps. Gemini can use web search and other tools alongside your sources. Use the standalone app for Studio outputs, and open shared notebooks there too.
For a claim that must come from your selected documents, work in Gemini Notebook and inspect the cited passage. Notebook changes syncing between apps does not make their responses, sharing options, or privacy rules identical.
Source Type Restrictions
Before a large import, check the file size, type, access rights, and what works on your device. For a database or a private system, check how to bring its data into the app. A pasted link may not provide access to the content you need.
Privacy Depends on the Account
Google's privacy terms say it does not use notebook content directly to train its core AI models unless you send feedback. On a personal account, feedback can include your sources for a team to review. Work and school accounts have their own terms.
Gemini Apps has its own data rules. Before adding private files or using both apps, check your account's terms and your workplace's rules. A source citation helps you find proof for a claim. You still need permission to share the file it came from.
How to Troubleshoot Large Projects
When answers get vague, narrow the selected sources and ask a smaller question before changing tools. A focused notebook may already contain everything you need.
Use this decision table when a project starts to sprawl:
| If your NotebookLM workflow looks like this | What to do in NotebookLM first | When to add another workspace |
|---|---|---|
| One course, one client brief, one paper, or one meeting pack | Keep one focused notebook. | Add another workspace only if the same sources must live in a long-term research map. |
| You mainly need cited chat plus audio, reports, quizzes, or mind maps | Use NotebookLM Studio outputs after citation checks. | Add another workspace only if those outputs need to become durable notes. |
| You keep asking questions that span several notebooks | Try one bridge note that lists what each notebook contains and excludes. | Add another workspace when cross-notebook synthesis becomes the normal task. |
| You need a durable research map that survives beyond one notebook | Use NotebookLM mind maps for quick review inside one notebook. | Add another workspace when the map needs to grow over months. |
Table 4: Collect the needed documents in one place when a question repeatedly crosses notebook boundaries.
Worked Example: Cross-Notebook Synthesis
Use this handoff only when the notebook boundary is blocking a question. A literature review may start in Gemini Notebook with separate notebooks for methods, findings, and counterarguments. Each chat then sees only part of the material you want to compare.
If you choose Atlas for the cross-notebook step, use it as a synthesis workspace while keeping NotebookLM for bounded source review:
- Collect the original files needed for the question from each notebook. Bring those files into Atlas yourself; this handoff does not import Google's notebook history.
- In one Atlas project, open Add a source, choose Upload files, and add the relevant PDF, DOCX, or PPTX documents. Wait for processing to finish.
- Start a chat. In Ask a question, type @ and select each source you want to compare.
- Ask:
Which findings in these sources agree, which conflict, and which use different methods? Give the supporting citation for each comparison. - Open each numbered citation and check the original material. PDF citations can identify a page or passage when that location is available; otherwise inspect the source itself.
- Ask Atlas to separate contributions that are hard to trace, then save the checked comparison in a note. Accept a conclusion only when the cited source supports it.
This workflow uses Atlas's documented source upload, source mentions, and citation controls. It does not establish that Atlas produces more accurate answers. Compare a question on your own documents before deciding whether a second workspace is useful.
For other tools, see NotebookLM alternatives and NotebookLM competitors.
Curious how NotebookLM stacks up against Claude's project feature? See our NotebookLM vs Claude Projects comparison.
What to Do Next
Start one Gemini Notebook project with sources for a question you need answered. Open the supporting passages, correct any overstatement, and save the checked result. If you need to edit your interpretation, use a written note; convert it to a source only when you want later questions to use it.
Generate an Audio Overview or study material after checking the source set and your remaining usage. If the question instead depends on documents spread across notebooks, collect those documents in one notebook or try the Atlas project workflow above.
Synthesize beyond one NotebookLM notebook
Bring core sources together, ask across them, and inspect each citation.