

Litmaps helps you find papers for a literature review. You can start from seed papers, follow citation links, see nearby work, and track a topic. The Litmaps guide shows how to find papers, see links, sort what you find, and run a new search as the topic changes. It does not complete the literature review by itself.
Use Litmaps to find and screen possible papers. Then move the papers that pass your screen into a workspace where you can read them, compare their findings, and check each source. Atlas fits this second stage because it can turn the chosen papers into cited answers, tables, themes, gaps, and notes for your draft.

Synthesize selected papers in Atlas
Add papers selected in Litmaps, compare themes, and inspect every citation.
Quick answer
Use Litmaps when you need to find linked papers and understand which works cite one another. Use Atlas after the search when you need to compare your chosen sources and open the text behind a claim.
That split keeps each tool in the job it handles well:
- Atlas helps after source selection, when you need answers tied to your papers, findings split by source, and links to the supporting text.
- Litmaps helps you grow a map from seed papers, tag what you find, and track new work.
- You still decide which papers belong, judge their quality, build the argument, and write the final review.
Citation maps can reveal papers you would miss with keyword search alone, but they do not prove that the search is complete. A literature review still needs a search of library tools, clear rules for which papers count, close reading, and source checks.
Atlas versus Litmaps jobs
Use this table to separate the paper search from the work that comes after it. For a broader view, read our guides to AI research assistants and AI tools for academic research. We also cover AI for literature review and literature review software.
| Job in the literature review | Atlas | Litmaps | Researcher responsibility |
|---|---|---|---|
| Find linked papers | Can help add papers by topic, title, DOI, or identifier | Strong fit for following citations from seed papers | Decide whether the search path is sufficient |
| Understand links | Builds maps from the sources you add | Shows which papers cite one another | Interpret what the links mean |
| Screen papers | Helps you read and ask questions about chosen sources | Helps organize and revisit possible sources | Apply inclusion and exclusion criteria |
| Compare findings | Strong fit for a cited review across chosen sources | Not the core job of a citation map | Judge how well the sources support the result |
| Verify claims | Citation badges help inspect supporting passages | Can point you toward papers to read | Open sources and check whether claims are supported |
Table 1: This is why a Litmaps-to-Atlas workflow is cleaner than asking one tool to do every step. Finding papers and reviewing what they show are different tasks.
Litmaps literature review workflow
Start with 1 to 3 seed papers that fit your research topic. A seed paper can be a recent review, a core theory paper, a method paper, or a study that an adviser already trusts. Litmaps' guide to citation-network search explains the map model for new users.
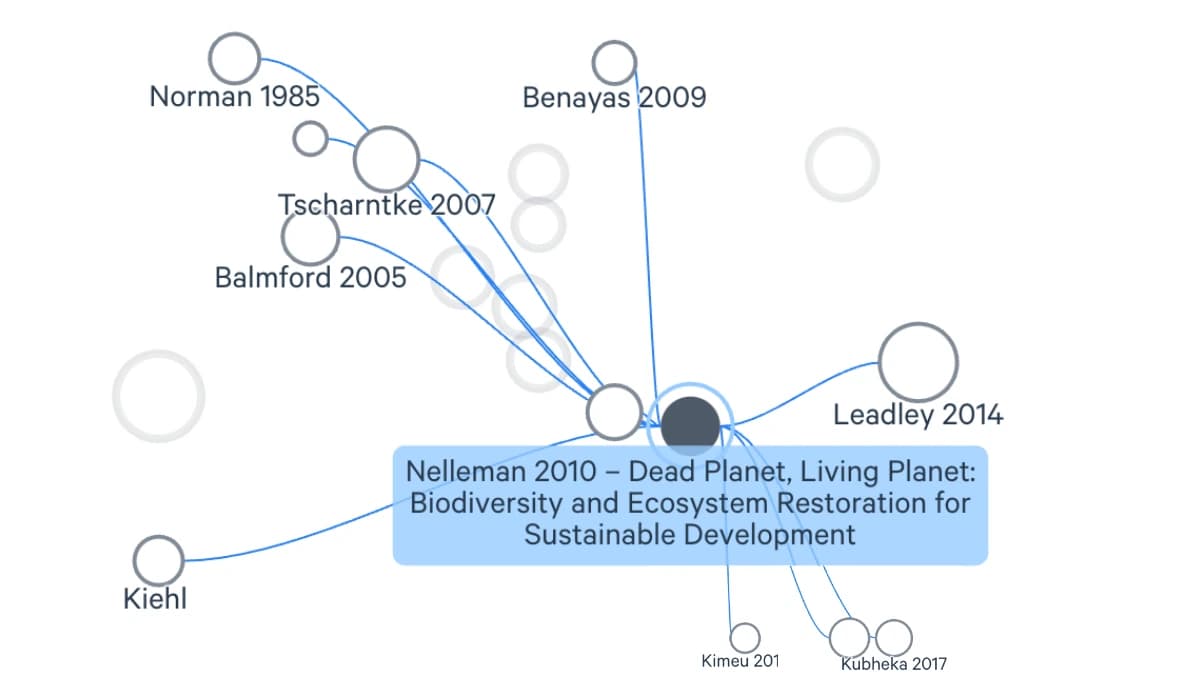
The screenshot shows the first workflow step in Litmaps: a seed paper sits among works that cite it or share references. The researcher treats nearby papers as a reading queue. Record why each paper belongs in the review before moving the final set into close reading and comparison.
Then work through the map in passes:
- Build the first map. Add the seed paper and inspect nearby papers before saving everything.
- Look backward and forward. Follow source lists to older work and citations to newer work.
- Save papers with a reason. Tag them by method, theory, group studied, or theme instead of keeping one large pile.
- Screen for fit. Ask whether each paper helps answer the research topic and what it would add to the review.
- Repeat with a stronger seed. If a newly found paper is more central than the original seed, build another map around it.
- Export or record the final set. Move only the papers you plan to read closely into the next workflow.
- Set alerts after the first screen. Alerts work better once you know the key terms and limits of the topic.
The mistake is treating the map as the review. The map is a discovery surface. The review begins when you decide what belongs, read the papers, compare evidence, and explain the pattern across sources.
What Litmaps does not solve
Litmaps does not replace a library search tool, a formal search plan, or your own review of source quality. Its map depends on the paper details and citation links that Litmaps can access. It can miss papers or links. It may also give too much weight to links that do not match your exact topic. Deakin's review of Litmaps and HKUST's guide to finding papers through citation links note these limits.
The main limits to keep visible are:
- Completeness: a citation map is not proof that the search is exhaustive.
- Quality appraisal: connected papers still need to be read and judged.
- Method fit: a paper can be central to a field and still irrelevant to your inclusion criteria.
- Findings: the map does not turn sources into themes, points of dispute, or a written case.
- Source checks: any claim in the final review must still be checked against the source passage.
For systematic or scoping reviews, use Litmaps as one discovery input within a documented method. Keep a record of where each source came from and why it was included.
Atlas synthesis workflow
After you have chosen the source set, move from searching to reviewing what the papers show. For a longer guide, read how to synthesize research papers.
- Add the chosen papers to an Atlas project.
- Wait until each source has processed.
- Ask a focused question such as "Which sources define the review topic differently?"
- Ask Atlas to keep each source clear: "Compare these papers in a table with claim, method, limit, and citation."
- Open citation badges for the claims that matter.
- Save the checked comparison as a note before drafting.
Atlas helps here because your task has changed. You are asking what the chosen papers say, where they agree, where they conflict, and which passage supports each claim.
Next step: when should you use Litmaps?
Use Litmaps when:
- You have at least one credible seed paper.
- The field has enough citation links to make a map worth using.
- You need to find nearby studies, older key works, or newer citing papers.
- You want to monitor a topic after the first search pass.
Use a library search tool or formal search plan when:
- The review method requires you to name each library source you searched.
- You need fixed search terms, a field-specific index, or queries that someone else can run again.
- Your course, adviser, or review plan names sources that you must search.
Add Atlas when:
- You have chosen papers and need to compare them with links to the source text.
- You need to compare how sources define a term, run a study, report a finding, or describe a limit.
- You want citations that link back to exact passages before drafting.
Use Litmaps first when finding papers is the bottleneck. Switch to Atlas when the chosen papers need a cited comparison. Stop expanding the map once the source set is strong enough to answer your research topic. For adjacent Litmaps workflows, see Litmaps for research and Litmaps for students.
Example Litmaps-to-Atlas workflow
A graduate student might start with one strong seed paper on retrieval-augmented generation. They use Litmaps to find newer citing papers and save eight possible sources. After screening them, they keep 5 papers that directly test ways to judge the system.
They add those 5 papers to Atlas and ask: "Compare the evaluation methods used in these papers, with one row per source and citations for each method claim." The table is ready for drafting only after the student opens each source badge and checks the quoted text.
Conclusion
Litmaps is strongest when you are still finding sources for a literature review. It helps you see connected papers and build a more informed reading list.
The review still depends on screening, reading, comparing findings, and checking sources. Use Atlas after Litmaps when chosen papers need to become cited tables, themes, gaps, and claims linked to their sources.
Synthesize selected papers in Atlas
Add papers selected in Litmaps, compare themes, and inspect every citation.